")
Posted by The Alchemy Editorial Team on 1st Jul 2016
The Process of Alchemy (Part 2 – Model Making)
 When each Alchemy jewellery design has been finalised, the drawings and
directions are sent from the studios into the model workshops for our
highly trained and experienced sculptors and engineers to interpret and
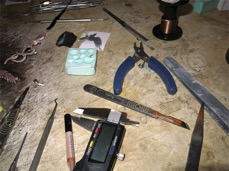
develop. Using mostly hand tools such as scalpels, needle files and
dental instruments, their skills as artistic precision technicians are
put to the task.
When each Alchemy jewellery design has been finalised, the drawings and
directions are sent from the studios into the model workshops for our
highly trained and experienced sculptors and engineers to interpret and
develop. Using mostly hand tools such as scalpels, needle files and
dental instruments, their skills as artistic precision technicians are
put to the task.
 From the original design concept, much research and development is
often needed to actually make the product fit for purpose! Nothing is
perfectly obvious and the most seemingly simple pieces can harbour
practical complications. From the most straight forward of pendants to
new, innovative designs, fresh challenges are constantly being thrown-up
and intelligent evolution helps to shape every new piece. Therefore,
each design must be carefully thought-through and practically
interpreted, especially using our experience and benchmarks from our
thousands of previous job records, in order to achieve a satisfying
result.
From the original design concept, much research and development is
often needed to actually make the product fit for purpose! Nothing is
perfectly obvious and the most seemingly simple pieces can harbour
practical complications. From the most straight forward of pendants to
new, innovative designs, fresh challenges are constantly being thrown-up
and intelligent evolution helps to shape every new piece. Therefore,
each design must be carefully thought-through and practically
interpreted, especially using our experience and benchmarks from our
thousands of previous job records, in order to achieve a satisfying
result.
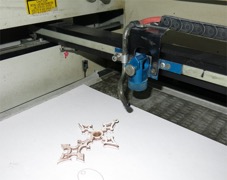
Almost all of Alchemy’s model making is achieved by old-fashioned hand-modelling techniques, with the aid of a sharp eye and very skilled and steady hands. However, some of the models require additional, highly technical drawings in order to engineer various miniature, precision components using processes such as milling, turning and, as pictured here, laser cutting. These files are developed on a computer and networked through to the model room for processing.
 Although many techniques are used in making Alchemy’s models depending
on the nature of each project, most sculpted models begin life as a lump
of soft, resin modelling clay mixed from two reactive parts of epoxy
which progressively hardens over a period of around half an hour.
Sometimes starting with an armature to define the model’s structure,
this is the time in which the basic shape and much of the model’s
character needs to be fashioned while it is soft and malleable enough to
work. Then as the material hardens, it lends itself more to paring and
cutting into shape using knives and various scalpel blades, etc. The
final stages are reached when the resin has fully hardened, often with
some assistance from baking, and is then suitable for filing, sawing,
chiselling, scraping and drilling, etc, allowing for more precision
detail to be cut.
Although many techniques are used in making Alchemy’s models depending
on the nature of each project, most sculpted models begin life as a lump
of soft, resin modelling clay mixed from two reactive parts of epoxy
which progressively hardens over a period of around half an hour.
Sometimes starting with an armature to define the model’s structure,
this is the time in which the basic shape and much of the model’s
character needs to be fashioned while it is soft and malleable enough to
work. Then as the material hardens, it lends itself more to paring and
cutting into shape using knives and various scalpel blades, etc. The
final stages are reached when the resin has fully hardened, often with
some assistance from baking, and is then suitable for filing, sawing,
chiselling, scraping and drilling, etc, allowing for more precision
detail to be cut.
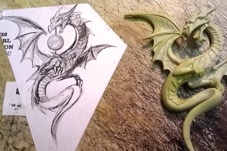
 This process is usually repeated many times to make-up the various
parts of a single model, built-up in stages with new, freshly mixed
resin being added to the previously hardened sections and much very fine
detail being applied to the surface, such as dragon scales, feathers
and numerous textures.
This process is usually repeated many times to make-up the various
parts of a single model, built-up in stages with new, freshly mixed
resin being added to the previously hardened sections and much very fine
detail being applied to the surface, such as dragon scales, feathers
and numerous textures.
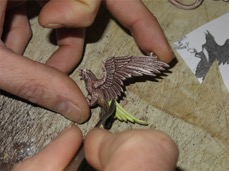
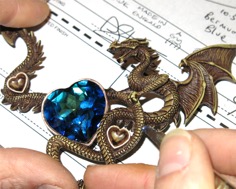
Of course, a considerable amount of precision work is often needed towards the later stages of a model where an exactness of fit is crucial, such as the setting of crystals or assembling multi component pieces, where we have to take into account very fine tolerances and the shrinkage rates of cast metal.
 When we think we’ve perfected the model’s form and all of its detail
and the piece, (often made in several separate components), is finally
finished to everyone’s satisfaction, we take silicon rubber moulds and
then cast-out reproductions in a poly-resin capable of withstanding the
heat and pressure of the eventual mould making process.
When we think we’ve perfected the model’s form and all of its detail
and the piece, (often made in several separate components), is finally
finished to everyone’s satisfaction, we take silicon rubber moulds and
then cast-out reproductions in a poly-resin capable of withstanding the
heat and pressure of the eventual mould making process.
Next month, Part 3 will explain our process of Moulding and Casting.